How to Work with GitHub Branches

Are you new to GitHub and want to learn more about branches? Or are you already familiar with the concept but want to dive deeper? Whatever the case may be, this comprehensive guide will teach you everything you need to know about working with GitHub branches. We’ve got you covered, from creating and deleting branches to merging and rebasing. So, let’s get started!
If you want to know how to work with GitHub, please click here: How to Use GitHub.
Table of contents:
- Introduction
- What are Branches
- GitHub Branch Actions
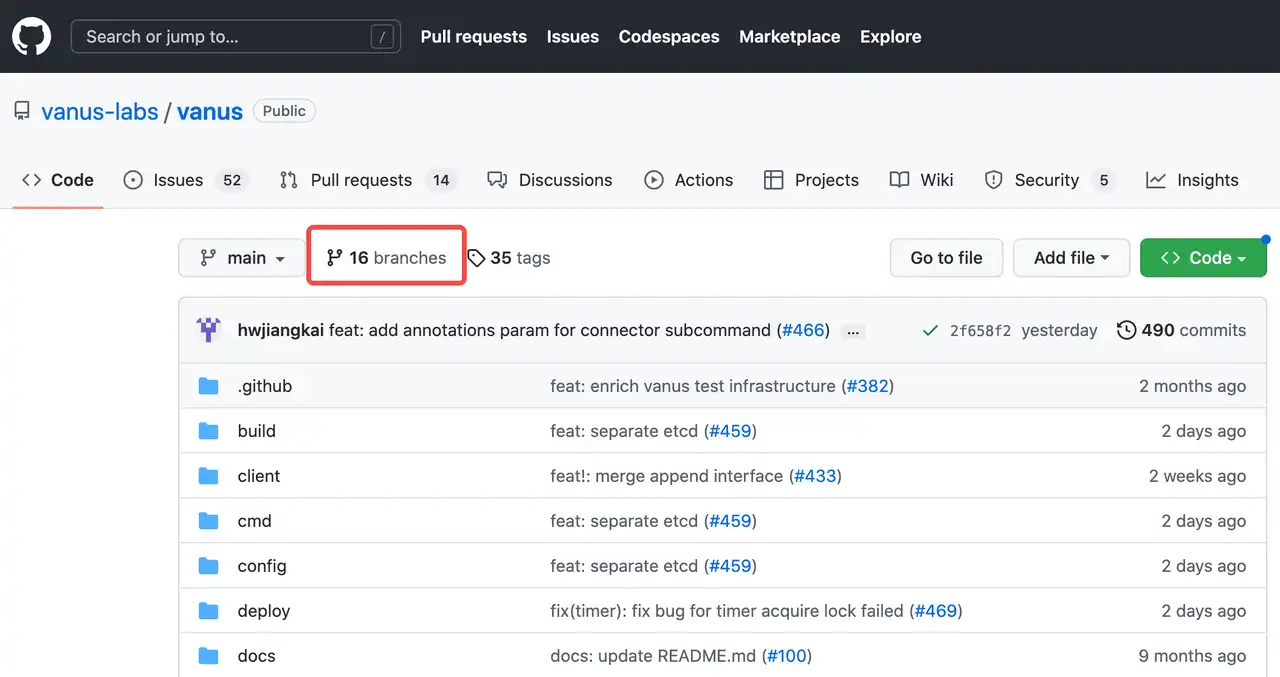
- How to create a New Branch
- Create a new branch before submitting a PR on GitHub
- How to rename a branch
- How to delete a Branch
- How to merge a Branch
- Conclusion
Introduction
GitHub is a powerful tool that allows developers to collaborate on code projects. One of the key features of GitHub is the ability to work with branches. Branches provide a way for developers to work on a new feature or bug fix without affecting the main codebase. In this guide, we will cover everything you need to know about working with GitHub branches.
What are branches
Before we dive into how to create, rename, delete, merge, and rebase branches, let’s first define what branches are and why they are useful.
Branches are a way to work on a separate copy of the codebase without affecting the main codebase. This allows developers to work on new features, bug fixes, or experiments without disrupting the main codebase. Once the branch is complete and tested, it can be merged back into the main codebase.
Why create a branch
Creating a branch has several benefits:
1. Isolation:
Branches allow developers to work on a new feature or bug fix without affecting the main codebase. This makes it easier to manage changes and reduces the risk of introducing bugs or breaking the codebase.
2. Collaboration:
Branches make it easy for multiple developers to work on the same codebase without stepping on each other’s toes. Each developer can work on their own branch and then merge their changes into the main codebase when they are ready.
3. Experimentation:
Branches provide a safe space for developers to experiment with new ideas without risking the stability of the main codebase.
Best practices for branching
Here are some best practices to keep in mind when working with branches:
1. Keep Branches Small
It’s a good idea to keep your branches small and focused on a specific task. This way, it’s easier to review and merge changes, and you can avoid conflicts with other changes that may be happening in the main codebase.
2. Use Descriptive Branch Names
When creating a new branch, use a descriptive name that reflects the purpose of the branch. This will make it easier to keep track of different branches and understand what changes were made in each branch.
3. Delete Branches Once They’re Merged
Once a branch has been merged into the main codebase, you can delete the branch to keep your repository clean and avoid clutter.
4. Test Your Branches Before Merging
Before merging a branch into the main codebase, it’s a good idea to test the changes to ensure that everything is working as expected.
GitHub Branch Actions
Now that we’ve covered the importance of branching and some best practices to keep in mind, let’s move on to some specific actions you can take when working with branches on GitHub.
How to create a new branch
Step 1: Create a new branch
a. Open your Git repository folder on your local computer using Git Bash or another terminal tool.
b. Use the following command to create a new branch (assuming you want to create a branch called “new-branch”) and immediately switch to that branch:
git checkout -b new-branch
Step 2: Make changes to the new branch
a. Make changes on the new branch, such as adding, modifying, or deleting files.
b. Use the following command to commit your changes to the local repository:
git add . \
git commit -m "Commit message"
Step 3: Push changes to the remote repository
a. Use the following command to push the new branch to the remote repository:
git push -u origin new-branch
b. This will create a new branch named “new-branch” in the remote repository and push the changes you made in the local repository to that branch. Now, others can see and make changes on that branch.
If you have any questions about how to push changes to GitHub, you can refer to the blog “How to Push to GitHub: A Beginner’s Guide” for detailed instructions.
Create a new branch before submitting a PR on GitHub
Creating a new branch before submitting a PR on GitHub is crucial for testing and experimenting with changes without affecting the main codebase. It also allows for working on multiple features or bug fixes simultaneously, reduces the risk of introducing bugs, and makes it easier for other developers to review and provide feedback.
When you want to contribute to an open-source project on GitHub, you can submit your changes by creating a Pull Request. The article “How to create a GitHub Pull Request” will provide you with detailed steps to create a Pull Request, guiding you through the entire process from forking the project, creating a branch, making changes, and sending the request.
How to rename a branch
Step 1: Find the branch you want to rename
Go to the repository where the branch is located. b. Click on the “Branches” tab to see a list of all the branches in the repository.
Step 2: Rename the branch
Find the branch you want to rename and click on the three dots on the right side of the branch name. b. Click on “Rename branch”.
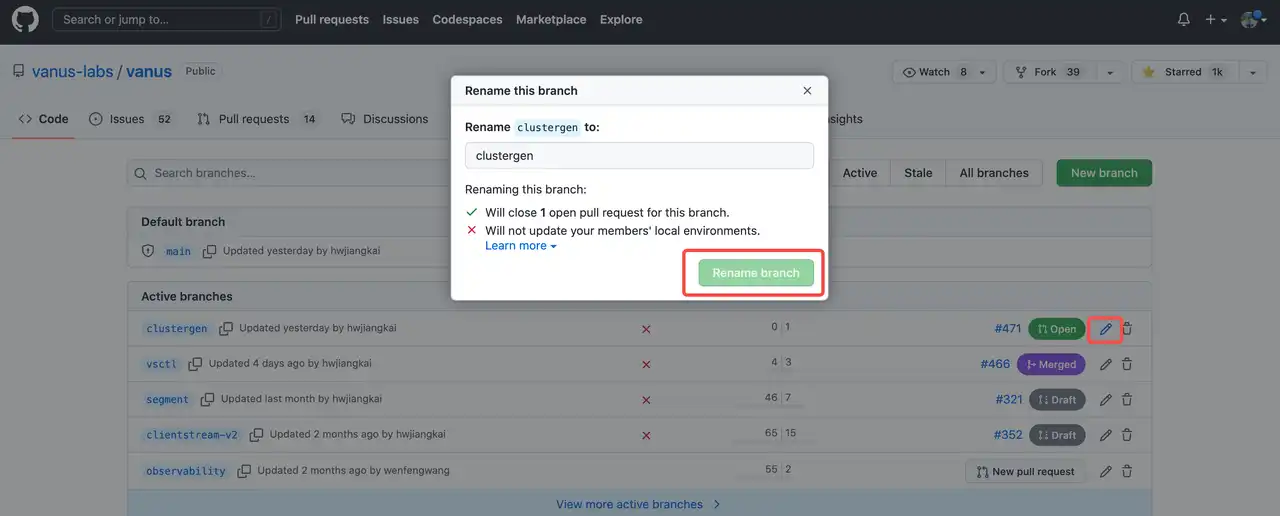
Step 3: Update references to the renamed branch
Make sure to update any references to the old branch name in your local repository. b. Update any references to the old branch name in any Pull Requests or other branches that reference the old branch name.
After renaming the branch, you should check that everything is working as expected. If you have any Continuous Integration (CI) or Continuous Deployment (CD) workflows set up, make sure they are still working correctly. You should also check any scripts or other tools that reference the branch to ensure they are still working as expected.
Renaming a branch can help you keep your repository organized and up-to-date. For example, you might want to rename a branch to better reflect the changes you have made or to bring it in line with the naming conventions used in your project. By following the simple steps outlined above, you can rename a branch on GitHub quickly and easily.
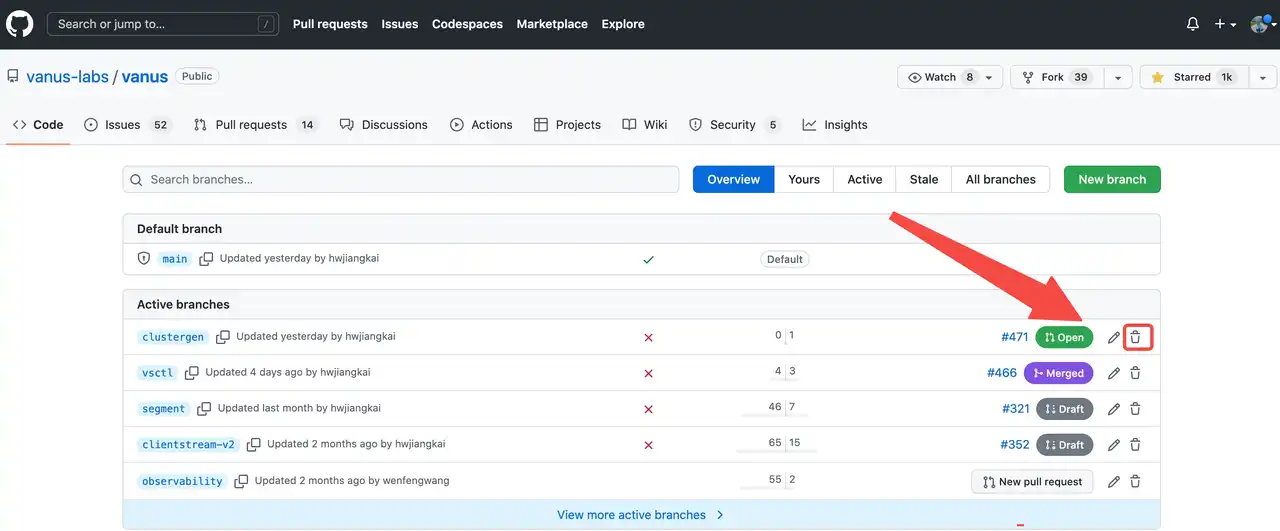
How to delete a Branch
If you have a branch in your GitHub repository that you no longer need, deleting it is a simple process. Here are the steps you can follow:
Step 1: Find the branch you want to delete
Go to the repository where the branch is located. b. Click on the “Branches” tab to see a list of all the branches in the repository.
Step 2: Delete the branch
Find the branch you want to delete and click on the delete icon on the right side of the branch name. b. Click on “Delete branch” and confirm that you want to delete the branch.
Step 3: Check for any references to the deleted branch
Make sure to check that no other branches or Pull Requests reference the deleted branch. b. If there are any references to the deleted branch, update them to point to a different branch.
After deleting the branch, make sure to double-check that everything is working as expected. If you have any Continuous Integration (CI) or Continuous Deployment (CD) workflows set up, make sure they are still working correctly. You should also check any scripts or other tools that reference the deleted branch to ensure they are still working as expected.
Deleting a branch can help you keep your repository organized and free up space in your repository. For example, you might want to delete a branch after it has been merged into the main branch. By following the simple steps outlined above, you can delete a branch on GitHub quickly and easily.
How to merge a branch
When you have finished working on a new feature or bug fix on a separate branch in your GitHub repository, you may want to merge the changes into the main branch. Here are the steps you can follow:
Step 1: Check out the main branch
Go to the repository where the branch is located. b. Click on the “Branches” tab to see a list of all the branches in the repository. c. Find the main branch and click on it to switch to it.
Step 2: Merge the branch
Click on the “Merge a pull request” button on the main branch page. b. Select the branch you want to merge from the “base” dropdown and the branch you want to merge into it from the “compare” dropdown.
Step 3: Resolve any conflicts
If there are any conflicts between the two branches, GitHub will highlight them on the merge page. b. Resolve any conflicts by selecting the appropriate changes to keep and discarding any conflicting changes.
After merging a branch on GitHub, it’s important to ensure that everything is still functioning correctly. This includes checking any Continuous Integration or Continuous Deployment workflows, as well as any scripts or tools that reference the merged branch. By doing this, you can ensure that any new changes are properly incorporated into the main branch and made available to users of your application or service.
Conclusion
In conclusion, branching is a powerful feature in Git that allows developers to work on multiple versions of their codebase simultaneously without fear of affecting the main codebase. By creating a new branch, you can experiment with new features, fix bugs, and make changes to your codebase without affecting the main branch. Additionally, branching allows multiple developers to work on different parts of the codebase simultaneously, making collaboration much easier.
By following the best practices outlined in this blog, you can ensure that your branching strategy is effective and efficient. Remember always to create a new branch when working on a new feature or bug fix, and to give your branches descriptive names. And remember to merge your changes back into the main branch once you’re finished!
We hope this guide has helped get you started with branching in Git. If you’re looking for more information, plenty of resources are available online, including the official Git documentation and community forums. Happy branching!