Build a Notification Pipeline from MySQL to Email in Seconds

As a developer for a popular e-commerce website, you know that integrating with external APIs is a common requirement for modern applications. However, if your website’s database is built using MySQL, you may face limitations when it comes to making HTTP requests. To overcome this challenge, you can build a custom MySQL pipeline that can send HTTP requests to the API. In this article, we will explore how to build such a pipeline using Vanus, a lightweight tool designed to stream data from MySQL databases to HTTP endpoints. With Vanus, you can easily integrate your MySQL database with external APIs, allowing your application to benefit from the latest data and functionality available in third-party services.
Table of content
- Event Streaming
- MySQL
- Pre-requisite
- How to send customized events from MySQL to HTTP
- Step 1: Deploy Vanus on the Playground
- Step 2: Deploy the MySQL Source Connector
- Step 3: Deploy the HTTP Sink Connector
- Check out the results
- Conclusion
Event Streaming
Event streaming is a technology that has gained significant popularity in modern applications. It involves the continuous and real-time processing of events or data generated by various sources. These events could include user actions, system events, sensor data, and more. By processing these events in real-time, applications can quickly respond to changes and make decisions based on the most up-to-date information.
Event streaming is particularly important in modern applications where data volumes are high and the need for real-time processing is critical. Traditional batch processing methods, where data is collected and processed in batches, can result in latency and delay in processing important events. Event streaming allows for a more responsive and real-time approach to data processing, which is essential in today’s fast-paced digital landscape.
Vanus is an open-source tool designed to facilitate event streaming from various sources. It allows users to collect, filter, and route events to different destinations in real-time. Vanus enables users to build flexible and robust event streaming pipelines that can be easily integrated into modern applications.
MySQL
Setting up a MySQL database
Setting up a MySQL database is the first step towards building a custom MySQL pipeline. Here’s a detailed explanation of how to set up a MySQL database:
- Download and Install MySQL: The first step is to download and install MySQL on your computer. You can download MySQL Community Edition for free from the MySQL website. Make sure to choose the correct version for your operating system.
- Configure MySQL: After installing MySQL, you need to configure it. During the installation process, you will be prompted to set a root password for the MySQL server. Make sure to remember this password, as you will need it later.
- Start MySQL Server: Once you have installed and configured MySQL, you need to start the MySQL server. To do this, open a terminal or command prompt and run the following command:
Copy code
sudo systemctl start mysqld
- This command starts the MySQL server and enables it to run in the background. Log in to MySQL: To interact with the MySQL server, you need to log in to it using the root password you set during the configuration process. To do this, run the following command:
mysql -u root -p
- This command logs you in to the MySQL server as the root user. Create a Database: Once you are logged in to the MySQL server, you can create a new database using the following command:
Copy code
CREATE DATABASE <database_name>;
- Replace <database_name> with the name you want to give your database. Create a Table: After creating a database, you need to create a table in the database. Tables are used to store data in a MySQL database. You can create a table using the following command:
Copy code
CREATE TABLE <table_name> (
<column_name> <data_type> <constraint>,
<column_name> <data_type> <constraint>,
...
);
- Replace <table_name> with the name you want to give your table. <column_name> represents the name of the column you want to create, and <data_type> represents the data type of the column. <constraint> is an optional parameter that sets constraints on the column. Insert Data: After creating a table, you can insert data into it using the following command:
INSERT INTO <table_name> (<column_name>, <column_name>, ...) VALUES (<value>, <value>, ...);
Replace <table_name> with the name of your table, <column_name> with the name of the column you want to insert data into, and <value> with the value you want to insert.
With these steps, you have set up a MySQL database and created a table with data. Now you can move on to building your custom MySQL pipeline that can send HTTP requests to an external API.
MySQL to HTTP scenarios
here are 10 real-life scenarios where you might need to set up a MySQL to HTTP pipeline:
- E-commerce website: As mentioned earlier, if you are building an e-commerce website with MySQL as the database, you may need to integrate with an external API that provides shipping or payment services. A MySQL to HTTP pipeline can be used to send data from the database to the API.
- Healthcare applications: Healthcare applications often need to integrate with external systems that provide electronic health records or patient information. A MySQL to HTTP pipeline can be used to securely transmit data to these systems.
- Financial applications: Financial applications may need to integrate with external systems that provide stock market data or banking services. A MySQL to HTTP pipeline can be used to send data to these systems.
- Social media platforms: Social media platforms may need to integrate with external systems that provide analytics or advertisement services. A MySQL to HTTP pipeline can be used to send data from the database to these systems.
- Customer relationship management (CRM) systems: CRM systems may need to integrate with external systems that provide customer support or sales services. A MySQL to HTTP pipeline can be used to send data from the database to these systems.
- Manufacturing and logistics: Manufacturing and logistics applications often need to integrate with external systems that provide supply chain management or inventory control services. A MySQL to HTTP pipeline can be used to send data to these systems.
- IoT devices: IoT devices often generate large amounts of data that needs to be stored and analyzed. A MySQL to HTTP pipeline can be used to send this data to external analytics or visualization tools.
- Gaming platforms: Gaming platforms may need to integrate with external systems that provide player statistics or leaderboard services. A MySQL to HTTP pipeline can be used to send data from the database to these systems.
- Government services: Government services often need to integrate with external systems that provide data on weather, traffic, or crime statistics. A MySQL to HTTP pipeline can be used to send data from the database to these systems.
- Educational platforms: Educational platforms may need to integrate with external systems that provide content or assessment services. A MySQL to HTTP pipeline can be used to send data from the database to these systems.
Pre-requisite
- A MySQL Server
- A Kubernetes cluster (We will use the playground)
- A webhook server (For testing use webhook for a free endpoint)
How to send customized events from MySQL to HTTP
Here are the steps you can follow to send email notifications from any MySQL event.
-
Step 1: Deploy Vanus on the Playground
-
Step 3: Deploy the HTTP Sink Connector
Step 1: Deploy Vanus on the Playground
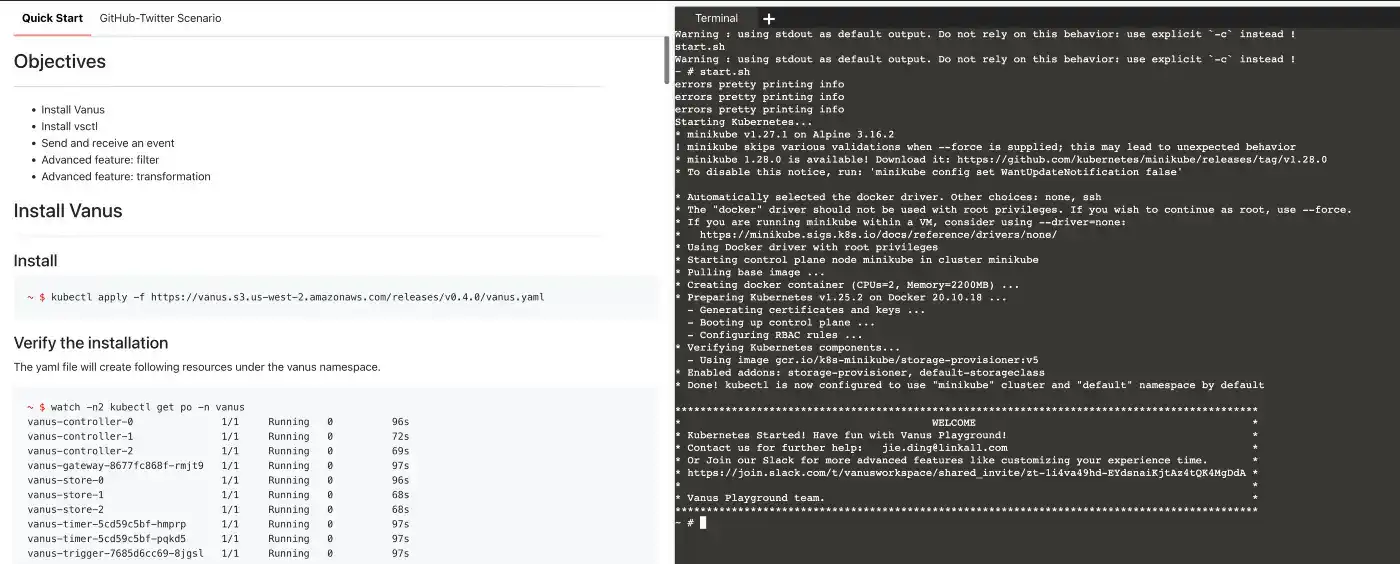
- Go to Vanus Playground, and click “Continue with GitHub”

-
Wait until the K8s environment is ready (usually less than 1 min).
-
Install Vanus by typing the following command:
kubectl apply -f https://download.linkall.com/all-in-one/v0.6.0.yml -
Verify if Vanus is deployed successfully:
$ watch -n2 kubectl get po -n vanus
  vanus-controller-0               1/1     Running   0          96s
  vanus-controller-1               1/1     Running   0          72s
  vanus-controller-2               1/1     Running   0          69s
  vanus-gateway-8677fc868f-rmjt9   1/1     Running   0          97s
  vanus-store-0                    1/1     Running   0          96s
  vanus-store-1                    1/1     Running   0          68s
  vanus-store-2                    1/1     Running   0          68s
  vanus-timer-5cd59c5bf-hmprp      1/1     Running   0          97s
  vanus-timer-5cd59c5bf-pqkd5      1/1     Running   0          97s
  vanus-trigger-7685d6cc69-8jgsl   1/1     Running   0          97s
-
Install vsctl (the command line tool).
curl -O https://download.linkall.com/vsctl/latest/linux-amd64/vsctl chmod ug+x vsctl mv vsctl /usr/local/bin -
Set the endpoint for vsctl.
export VANUS_GATEWAY=192.168.49.2:30001 -
Create an Eventbus to store your events.
$ vsctl eventbus create --name mysql-http-scenario
+----------------+--------------------+
|     RESULT     |       EVENTBUS     |
+----------------+--------------------+
| Create Success | mysql-http-scenario|
+----------------+--------------------+
Step 2: Deploy the MySQL Source Connector
- Enable binary logging if you have disabled it (MySQL default Enabled). Create a new USER and grant roles, choose a unique password for the user.
To enable binary logging in MySQL, you need to perform the following steps:
- Open the MySQL configuration file, which is typically located at /etc/mysql/my.cnf on Linux or C:\ProgramData\MySQL\MySQL Server 8.0\my.ini on Windows.
- Look for the [mysqld] section of the configuration file, which contains various settings for the MySQL server.
- Add the following line to the [mysqld] section to enable binary logging:
log-bin=mysql-bin
This will tell MySQL to create binary log files in the mysql-bin directory. You can change the name of the directory if you prefer.
- Save the configuration file and restart the MySQL server for the changes to take effect:
sudo service mysql restart
or
sudo systemctl restart mysql
- Verify that binary logging is enabled by logging into the MySQL server and running the following command:
SHOW MASTER STATUS;
This will display information about the binary log files that are currently being used by the MySQL server. If binary logging is not enabled, this command will return an error.
  CREATE USER 'vanus'@'%' IDENTIFIED WITH mysql_native_password BY 'PASSWORD';
  GRANT SELECT, RELOAD, SHOW DATABASES, REPLICATION SLAVE, REPLICATION CLIENT ON . TO 'vanus'@'%';
- Create the config file for MySQL in the Playground. Change MYSQL_HOST, MYSQL PORT, PASSWORD, DATABASE_NAME, and TABLE_NAME.
cat << EOF > config.yml
  target: http://192.168.49.2:30002/gateway/mysql-http-scenario # Vanus in Playground
  name: "quick_start"
  db:
  host: "MYSQL_HOST" # IP address of MySQL server
  port: MYSQL PORT # port address of MySQL server
  username: "vanus" # Username
  password: "PASSWORD" # Password previously set
  database_include: [ "<DATABASE_NAME>" ] # The name of your database


# format is vanus_test.tableName
table_include: [ "TABLE_NAME" ] # The name of your Table

store:
type: FILE
pathname: "/vanus-connect/data/offset.dat"

db_history_file: "/vanus-connect/data/history.dat"
EOF
- Run MySQL Source in the background
  docker run -it --rm --network=host \
  -v ${PWD}:/vanus-connect/config \
  -v ${PWD}:/vanus-connect/data \
  --name source-mysql public.ecr.aws/vanus/connector/source-mysql &
Step 3: Deploy the HTTP Sink Connector
To run the HTTP sink in Kubernetes, you will need to follow the below steps:
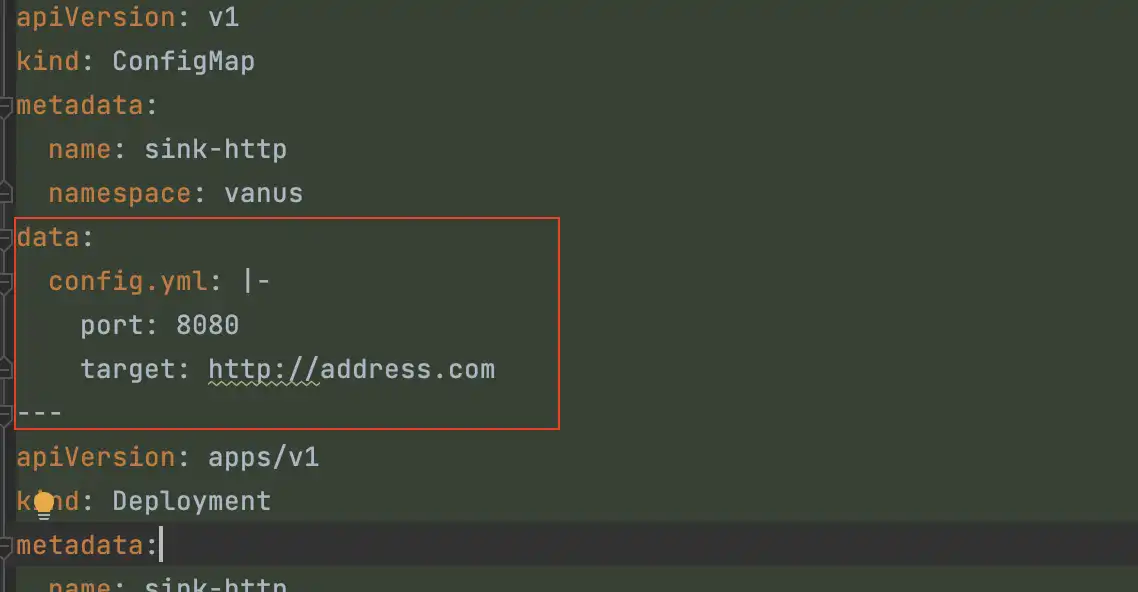
- Create a Kubernetes deployment file (e.g., sink-http.yaml) that includes the following configurations:
cat << EOF > sink-http.yml
apiVersion: v1
kind: Service
metadata:
  name: sink-http
  namespace: vanus
spec:
  selector:
    app: sink-http
  type: ClusterIP
  ports:
    - port: 8080
      name: sink-http
---
apiVersion: v1
kind: ConfigMap
metadata:
  name: sink-http
  namespace: vanus
data:
  config.yml: |-
    port: 8080
    target: http://address.com
---
apiVersion: apps/v1
kind: Deployment
metadata:
  name: sink-http
  namespace: vanus
  labels:
    app: sink-http
spec:
  selector:
    matchLabels:
      app: sink-http
  replicas: 1
  template:
    metadata:
      labels:
        app: sink-http
    spec:
      containers:
        - name: sink-http
          image: public.ecr.aws/vanus/connector/sink-http:latest
          imagePullPolicy: Always
          resources:
            requests:
              memory: "128Mi"
              cpu: "100m"
            limits:
              memory: "128Mi"
              cpu: "100m"
          ports:
            - name: http
              containerPort: 8080
          volumeMounts:
            - name: config
              mountPath: /vanus-connect/config
      volumes:
        - name: config
          configMap:
            name: sink-http
EOF
- Edit the configuration in it.
vi sink-http.yaml
NOTE: Remember to replace values of URL and Port.
Check out the results
- Finally, you can create a subscription that will define how the events should be transformed before being sent to the sink connector.
- You can use the following command to create a subscription:
Copy code
vsctl subscription create \
--name mysql-http-subscription \
--eventbus mysql-http-scenario \
--sink sink-http \
--transformer '{
"define": {
"user": "$data.user",
"password": "$data.passwprd",
"email": "$data.email"
},
"template": {
"User": "<user>",
"Password": "<password>",
"Email": "<email>"
}
}'
Here, we are creating a subscription named “mysql-http-subscription” that will consume events from the “mysql-http-scenario” Eventbus and send them to the “sink-http” sink connector. We are defining three variables using the “define” parameter: “user”, “password”, and “email”, which will store the corresponding values from the incoming events. Finally, we are using the “template” parameter to create a JSON template that will replace the variables with their corresponding values in the transformed events. Once you have created the subscription, it will start consuming events from the Eventbus, transform them according to the specified rules, and send them to the HTTP endpoint using the sink connector.
Conclusion
In conclusion, connecting MySQL to HTTP endpoints can be a powerful tool for data integration and automation. By using Vanus, we can easily set up subscriptions to capture changes in MySQL databases and send them to HTTP endpoints in real-time, without the need for complex coding or configuration. This can enable a wide range of use cases, from syncing data between systems to triggering workflows based on database events. With the step-by-step guide and examples provided in this article, you should now have a good understanding of how to use Vanus to create MySQL-to-HTTP subscriptions and customize them using the transformer feature. We hope this article has been helpful in getting you started with this powerful tool and exploring the possibilities it offers for your data integration needs.